Building a canned beverage brand through OEM manufacturing involves more sequential decisions — each one prerequisite to the next — than most first-time founders expect. Missing a step does not mean the process stops; it means the consequences of the missed step surface later, at greater cost and at a moment that causes more disruption. The formula you rush through sample approval for becomes the product that fails shelf-life testing at 6 months. The label you approve without a regulatory check becomes the SKU that clears customs in one country and fails in another. The OEM agreement you sign without jurisdiction clauses becomes the contract you cannot enforce.
Why we wrote this: At Laizhi Beverage, we have walked hundreds of brand owners through this process, and the questions they ask after something has gone wrong are almost always questions they could have resolved in the first six weeks if they had known what to ask. This 20-step checklist is the structured sequence we walk our clients through from day one.
Key Takeaways
- The full process from initial concept to first container delivery takes 18–24 weeks — understanding the timeline prevents the most common strategic error: committing to a retail launch date before the production date is confirmed.
- Sample approval is the most under-scheduled phase — brands that rush formula sign-off typically need 5–12 iterations before a formulation is finalized, and each iteration adds 2–3 weeks to the clock.
- The OEM selection decision should be made on certifications, R&D capability, and format flexibility — not on the lowest price per can.
- Label and packaging artwork must be finalized before production deposit is paid — changes after production begins incur significant cost and delay.
- Pre-shipment inspection is non-negotiable on a first order — it is the only moment between production completion and container loading where a quality issue can be identified and addressed without receiving defective goods.
Phase 1: Strategy and Market Research (Weeks 1–2)
Step 1: Define Your Target Consumer and Functional Benefit
Before any product development begins, commit to a specific target consumer and one clear functional benefit your product will deliver. Your first product doesn't need 15 functional ingredients. Start with a clean, effective formula you can afford to produce. The founding hypothesis should be expressible in one sentence: "This is a zero-sugar energy drink for urban professionals in their 30s who want cognitive performance without caffeine crash." Vague positioning — "a healthy drink for everyone" — produces vague formulation briefs, which produce vague samples, which produce no competitive differentiation on shelf.
Step 2: Validate the Category and Unit Economics
Research the category your product will enter: market size, growth rate, major incumbent brands, retail price range, and the unit economics that define whether the category is commercially viable for a new entrant. Your target cost of goods should be 25–35% of your retail price for sustainable margins. If your target retail price is $2.99 and your estimated COGS (including OEM production, cans, labels, and freight) comes to $1.50, the math does not work for retail distribution without a fundamentally different cost structure or a higher price point. Resolve the unit economics before investing in product development, not after.
Step 3: Select Your Target Market and Regulatory Map
Identify the specific countries or regions where you plan to sell your first container — not "globally," but specific named markets. Then map the regulatory requirements for those markets: caffeine limits, sugar tax applicability, mandatory label languages, halal certification requirements, and import documentation requirements. Each of these shapes your formulation brief and your label design. Building a product for the UAE market requires understanding the 100% excise tax on energy drinks and the Arabic language labeling mandate before you write your first formulation brief — not after you have approved a sample that cannot be legally sold in your target market.
We have worked with brand owners who launched sample approval of a caffeinated energy drink before checking the target market's caffeine regulatory ceiling — and discovered during label review that their formulation exceeded the allowable concentration for their primary target market. The reformulation cost three weeks and two additional sample rounds. The regulatory research would have taken two hours. This pattern repeats: the most expensive mistakes in the OEM beverage process are almost always the result of a decision made before the information needed to make it correctly was gathered. The checklist below is structured to front-load the research that prevents these mistakes, not to document them after the fact.
Phase 2: OEM Manufacturer Selection (Weeks 3–6)
Step 4: Write a Formulation Brief
A formulation brief is the technical specification your OEM manufacturer uses to develop your product. It must include: beverage category (carbonated energy drink, functional sparkling water, etc.); target flavor profile and any flavor references; functional ingredient requirements and dosing targets; carbonation level (in volumes of CO2); target Brix (sweetness); sugar content (zero-sugar, reduced-sugar, standard); required certifications (halal, organic, HACCP); target shelf life; and any ingredient exclusions (no artificial colors, no preservatives, etc.). A brief that says "something like Red Bull but healthier" gives a food scientist nothing to work with. A brief that specifies 160mg natural caffeine, L-theanine 100mg, B vitamins, zero sugar, lemon-ginger flavor, 250ml slim can, 12-month shelf life, halal certification required gives them everything.
Step 5: Build Your OEM Shortlist
A reliable beverage manufacturer must comply with international quality and food safety standards — and you should ask for scanned certificates or digital copies, not verbal confirmation. Build a shortlist of 3–5 OEM manufacturers by evaluating: HACCP and ISO 22000 certification status; export track record (which countries they currently supply); can format capability (250ml, 330ml, 355ml, 500ml) on the same line; R&D capability (can they develop a custom formula, or only white-label existing products?); and MOQ flexibility (is their minimum viable for your launch volume?). Our facility at Laizhi Beverage operates 50 filling lines with HACCP certification and active export documentation to over 30 countries — the kind of specificity you should look for in any manufacturer evaluation.
Step 6: Evaluate Manufacturers Against Your Checklist
For each shortlisted manufacturer, confirm: HACCP certificate validity and certifying body; ISO 22000 status; halal certification (if required); FDA registration (if targeting US market); fill line compatibility for your target can format; minimum order quantity for a canned carbonated product; standard lead time from deposit to production completion; and export documentation capability (certificate of origin, phytosanitary, food safety certificate for your target markets). Look for essential certifications such as SQF Food Safety, FDA registration, and Organic if applicable.
Step 7: Request Samples or Product References
Before entering formal discussions, ask shortlisted manufacturers for samples of current products they are producing in your target category. A manufacturer producing energy drinks for the European market, for example, can provide you with reference products that demonstrate their filling quality, seam integrity, label registration, and formulation capability. Taste the samples. Check the seam. Check the fill level against the label declaration. Check the carbonation level. These physical samples tell you more about a manufacturer's real capability than any capability presentation.
Step 8: Select Your OEM Partner and Initiate NDA
Select your primary OEM manufacturer and initiate a Non-Disclosure Agreement before sharing your formulation brief. Your formulation, once disclosed, is your competitive differentiation — particularly if you are developing a proprietary functional ingredient combination. An NDA is standard practice and any reputable OEM manufacturer will expect and accommodate one. Have your lawyer review the NDA terms, particularly around formulation ownership, exclusivity (if applicable), and jurisdiction for dispute resolution.
Phase 3: Sample Development and Approval (Weeks 6–10)
Step 9: Submit Your Formulation Brief and Receive Initial Samples
Submit your formulation brief to your OEM manufacturer and schedule receipt of initial samples. Experienced manufacturers typically conduct a pilot production run before full-scale manufacturing. The initial sample run for a carbonated canned beverage typically produces 50–200 cans — enough for taste panel evaluation, carbonation measurement, and preliminary shelf-life assessment. Allow 2–3 weeks for the initial sample production cycle.
Step 10: Conduct Structured Taste Panel and Technical Assessment
Evaluate initial samples against your brief systematically, not just by personal preference. Assess: carbonation level (measure in volumes of CO2 if you have the equipment, or measure by the feel and decay rate in tasting); Brix (sweetness) versus target; flavor accuracy versus your brief; fill volume versus label declaration; seam quality (visual check for consistent double seam); and headspace (the small air gap above the liquid, which should be consistent and appropriate for the carbonation level). Note every deviation from brief parameters in writing — this becomes your sample revision request to the manufacturer.
Step 11: Iterate Through Sample Rounds Until Approval
Most successful beverage brands go through 5–12 formula iterations before finalizing. Plan for this. Budget for this. Schedule for this. Each sample round typically takes 2–3 weeks from submission of your revision notes to receipt of updated samples. If your launch timeline cannot accommodate 3–4 sample rounds, either your launch date is wrong or your formulation brief was comprehensive enough that the manufacturer can hit it in fewer iterations — the latter happens, but planning for it as the base case is how brands end up launching products that do not match their original vision.
Step 12: Conduct Shelf-Life Testing and Regulatory Review on Approved Sample
Once you have approved a sample formulation, commission accelerated shelf-life testing through an independent food testing laboratory. Accelerated shelf-life tests run samples at elevated temperature and humidity to simulate months of storage in weeks — giving you early-signal data on oxidation, flavor degradation, carbonation loss, and microbiological stability before you commit to a full production run. Simultaneously, submit your approved label draft to a regulatory consultant for review against your target market requirements. Do not proceed to production until both the shelf-life data and the regulatory label review are complete.
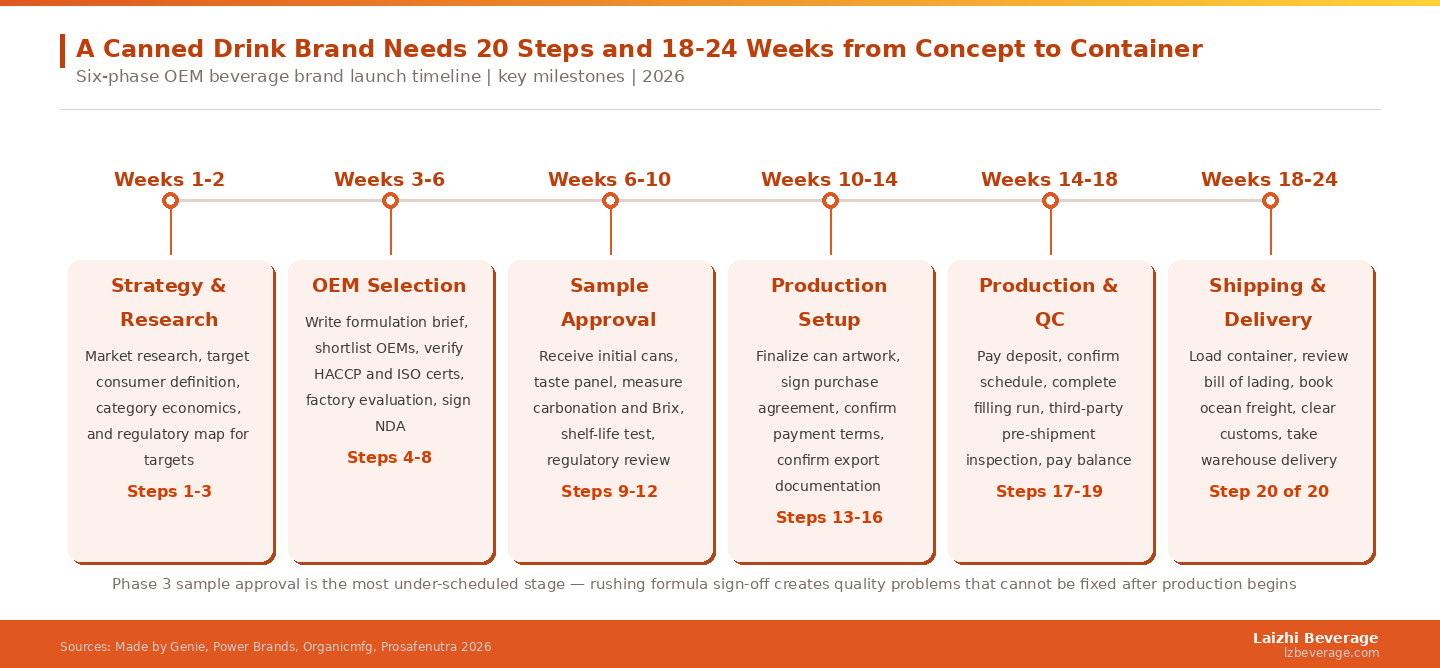
Phase 4: Production Setup (Weeks 10–14)
Step 13: Finalize Can Artwork and Label Design
Your can artwork must be completed, approved, and sent to the manufacturer's print supplier before the production deposit is paid. Avoid scheduling major promotions or launches until you have a confirmed production date — and you cannot have a confirmed production date until your artwork is approved and your cans are ordered, since specialty can printing typically leads production by 4–6 weeks. All mandatory label elements — ingredient list, nutritional panel, net contents, allergen declarations, certification marks, and language requirements for each target market — must be finalized at this stage, not revised post-production.
Step 14: Finalize and Sign the Purchase Agreement
Your purchase agreement with the OEM manufacturer should specify at minimum: product specifications (reference the approved sample); quantities; unit price; payment terms (T/T or LC structure, deposit percentage, balance payment trigger); delivery terms (Incoterms: FOB, CIF, or DAP); production timeline and shipment date; quality acceptance criteria; pre-shipment inspection rights; governing law and dispute jurisdiction; and formulation ownership. Have your lawyer review this document before signing. The purchase agreement is the primary legal protection for both parties — the time to negotiate it is before production begins, not when a dispute has arisen during or after.
Step 15: Confirm Export Documentation Requirements
Confirm with your OEM manufacturer which export documents will be required for customs clearance in your destination market: commercial invoice, full set of clean on-board bills of lading, packing list, certificate of origin (Form A, Form E, or other depending on trade agreement applicability), phytosanitary certificate (required by many markets for beverages containing plant-derived ingredients), food safety certificate, HACCP certificate copy, and halal certificate (if applicable). Each document must be accurate and consistent — discrepancies between the commercial invoice quantity and the packing list, for example, can delay customs clearance and incur costly demurrage charges.
Step 16: Arrange Freight Forwarding and Import Logistics
Engage a freight forwarder experienced in food and beverage imports from China or your OEM's country of production. Confirm container type (typically a 20ft or 40ft reefer or dry container depending on product temperature requirements), estimated loading date, port of departure, port of arrival, and estimated transit time. For canned carbonated beverages, dry containers are standard — the cans are shelf-stable and do not require refrigerated transport. Confirm import duty rates for your product's HS code in your destination market before finalizing your COGS model — duty rates on beverage imports vary significantly between markets and between product categories within beverages.
Phase 5: Production and Quality Control (Weeks 14–18)
Step 17: Pay Production Deposit and Confirm Production Schedule
Once the purchase agreement is signed and your artwork is in the manufacturer's system, initiate the production deposit payment per your agreed payment terms. Confirm the specific production date and line allocation with your manufacturer — production scheduling at most OEM facilities is done weeks in advance, and your date is not confirmed until the deposit is received and the schedule is updated. Request a production schedule document that specifies: raw material preparation date, can and lid delivery date, filling date, QC inspection date, and estimated ready-for-inspection date.
Step 18: Conduct Third-Party Pre-Shipment Inspection
Engage an independent third-party inspection company (SGS, Bureau Veritas, TÜV SÜD, or equivalent) to conduct pre-shipment inspection at your manufacturer's facility before the balance payment is released. Request samples from the lab where your drink was developed and send them to the manufacturer — use these fresh lab samples to compare flavor, color, and aroma just before filling to ensure accuracy. The pre-shipment inspection should verify: fill volume (measured against label declaration), carbonation level, seam integrity (measured per industry standard), label accuracy (all mandatory elements present and correctly positioned), quantity count, and packing configuration (cartons, pallet layout). Only release your balance payment after reviewing the inspection report — a passing inspection report is your evidence that the goods match the specification.
Step 19: Release Balance Payment and Confirm Shipment Loading
Once the pre-shipment inspection passes, release your balance payment per the agreed payment terms. Confirm with your OEM manufacturer the container loading date, container number, and vessel name. Obtain the draft Bill of Lading from your freight forwarder for review before the final B/L is issued — check that all details (shipper, consignee, notify party, product description, quantity, marks and numbers) are accurate. The B/L is the title document for your goods; errors on the B/L are significantly more complex and expensive to correct after the container has sailed than before.
Phase 6: Shipping, Customs, and Delivery (Weeks 18–24)
Step 20: Manage Customs Clearance and Take Warehouse Delivery
Provide all export documentation to your customs broker in your destination country at least 48 hours before the vessel arrives. Common customs clearance requirements for imported canned beverages include: commercial invoice, packing list, bill of lading, certificate of origin, phytosanitary certificate, food safety certificate, and nutrition/ingredient declaration. Some markets (Australia, the European Union, the United States) have specific pre-notification requirements for food imports — confirm these with your customs broker in advance. After customs clearance, arrange inland transport from the port to your warehouse or fulfillment center. Conduct a receipt inspection — count pallets, check for transit damage, and retain samples from the first production run for your quality records.
You now have your first container. Understanding how experienced OEM manufacturers structure ongoing production relationships after the first container — pricing schedules for repeat orders, volume discount thresholds, label revision processes, and new SKU development protocols — is the conversation that turns a first order into a brand.
Next Steps Action Plan
- Today: Write your one-sentence brand positioning statement ("This product delivers [benefit] to [specific consumer] via [format]") before starting any supplier conversations — your formulation brief cannot be written without it.
- This week: Map your target market's regulatory requirements for beverage imports — caffeine limits, labeling language, halal certification, sugar tax applicability — before writing your formulation brief.
- Next month: Send your formulation brief to at least three OEM manufacturers simultaneously — comparing their initial sample responses is the most efficient way to evaluate their R&D capability without committing to a production relationship.
- Next month: Schedule 4 sample rounds at 2-3 weeks per round in your product development timeline before committing to a retail launch date — this is the buffer that prevents the most common and costly first-launch failure mode.
- Before signing your purchase agreement: Have your lawyer review it specifically for formulation ownership clauses, payment release conditions, jurisdiction for dispute resolution, and quality acceptance criteria — these four sections determine the enforceability of your core commercial rights.
Frequently Asked Questions
How long does it really take to launch a private label canned beverage brand?
The private label launch journey typically spans 12 to 24 weeks from initial market research through first delivery, with beverage brands at the longer end of that range due to the complexity of carbonation formulation, regulatory approval, and can artwork production lead times. If you are launching a custom-formulated energy drink targeting the European market with halal certification and Arabic language labeling, plan for 20–26 weeks. If you are launching a lightly modified version of a manufacturer's existing formula in your home market with standard labeling, 14–18 weeks is achievable. The fastest path is always to start with a nearly-ready formulation, target a single market, and run sample approval in parallel with regulatory review rather than sequentially.
What is the minimum order quantity (MOQ) for canned carbonated drinks?
Aluminum cans typically require higher minimum order quantities — often 50,000 units or more — for custom-labeled production runs. The exact MOQ depends on the manufacturer, the can format (250ml, 330ml, 355ml, or 500ml), the label printing method (lithographed cans require larger minimums than paper-labeled cans), and whether you are using a house formula or a custom formulation. Some manufacturers accept 10,000–20,000 can minimums for paper-labeled standard formats; lithographed cans (where the artwork is printed directly onto the aluminum) typically require 100,000+ unit minimums due to printing plate costs. Discussing MOQ structures for energy drink and carbonated beverage production with your OEM partner early in the process prevents the common mistake of designing a product around a format that doesn't fit your first-order volume.
Do I need to visit the factory in person before placing my first order?
A factory visit adds significant value for first-time OEM buyers — there is meaningful information about a facility's food safety culture, equipment condition, and operational discipline that you cannot extract from certifications or video calls. However, if geography makes a visit impractical, the alternatives are: a video factory tour that covers the filling lines, QC stations, CIP systems, and warehouse; a third-party factory audit by an independent food safety auditing firm; and verification of the manufacturer's third-party audit history. For orders above $50,000 on a first engagement, we recommend at minimum a video tour and a third-party audit report before committing to production.
What happens if my pre-shipment inspection fails?
If the pre-shipment inspection identifies a material non-conformance — fill volumes below declaration, carbonation outside specification, seam quality failure, incorrect label elements — you have three options: require the manufacturer to rework or repackage the failing units before the balance payment is released; negotiate a price reduction to account for the quality shortfall; or reject the order and apply the legal remedies defined in your purchase agreement. The leverage point is the balance payment — once it is released, your leverage is primarily contractual rather than financial. This is why the pre-shipment inspection must occur before balance payment, not after container loading. It is your only practical quality checkpoint before the goods are in a vessel in international transit.


